YouTube

Linkedin

Facebook

Call us:
317-299-0541

  • Home
  • About Us
    • Our Staff
  • Services
  • Portfolio
    • Our Projects
  • Qualifications
  • Blog
  • Contact Us
  • Online Shop
Wall Washed Lighting & Lighting Placement for Ceramic Tile Walls
February 19, 2014
  In News

Wall Washed Lighting & Lighting Placement for Ceramic Tile Walls


Lighting placement can make a dramatic difference in the appearance of wall tile.   Wall-washed type lighting, where lights are located either at the wall in the ceiling, or mounted directly on the wall, is a popular lighting technique.   Any type of lighting located on or near tile walls accentuates irregularities by casting shadows on the tile surface joints.

In a documented case study, Jess McIlvain, a leading independent consultant and registered architect, as well as a member of the Construction Specifications Institute, wrote an article highlighting the problems associated with wall-wash type lighting.  He wrote, “….in a high rise office building, the architect selected two inch square ceramic mosaic tile for toilet room floors and walls.  Lighting was…a high efficiency type lighting, located in the ceiling adjacent to the walls directly above the toilet fixtures and lavatories.  This type of light, which is similar to street lighting now used in many large cities, produces a harsh, warm, orange color.  When used as wall-wash, it will produce strong shadows that make even the smoothest and flattest of materials appear as miniature relief maps of the Swiss Alps.  When used with 2×2 inch square ceramic mosaic tiles and a contrasting color grout, this type of lighting will make Mr. Goodtile’s best workmanship appear as though it had been pasted up with six brands of bubble gum by a blindfolded demolition expert.  Yet, many architects and building owners insist on using this lighting with tile walls and do not understand why the tile work on certain walls looks so crummy under these conditions.”

So, was this a defective installation?  No.  The problem lies in the location of the lighting that caused the unacceptable appearance.

According to Daltile, a leading manufacturer of floor and wall tile, they have identified several problems and preventions as follows:

PROBLEMS

  • Any type of lighting located on or near tile walls accentuates irregularities by casting shadows on the tile surface joints
  • The appearance of tile installation is especially affected by critical lighting due to the small individual units, such as 2”x2” tile sizes, and the practical tolerances allowed in the manufacturing of tile
  • Critical light problems occur when the tile wall is bathed in vertical light from the ceiling directly over the wall
  • Critical light problems also occur when outside natural light, through windows and doors, casts shadows form slightly irregular tile surfaces
  • Small die release lines inherent on the edges of some tiles can produce large shadows from wall-washed lighting
  • Thin-set mortar installations over masonry walls with critical lighting produce an almost impossible condition for shadow free walls

PREVENTIONS

  • Locate light fixtures at least 24 inches away from the wall; preferable in the center of the room
  • Avoid the use of ceramic mosaics and scored tile where wall lighting is necessary
  • Requiring smooth, flat wall or floor surfaces within ANSI standards’ tolerances will reduce the shadows
  • Installing the permanent lights prior to the tile installation will allow the tile installer to make adjustments during the installation
  • Changing the thin-bed installation to a mortar bed installation with the tile installed while the bed is soft will reduce installation shadows, but will not eliminate the shadows produced by the irregularities in the tile

I personally have witnessed “wall washed” complaints.  There is no solution from a tile installation stand point — the only solution is to move the lighting.  The following photos will illustrate the difference of over head lighting placement.

img-131125316-0001

Scratching the Surface: The Mysteries of Floor Preparation – Gisa Ott
December 19, 2013
  In Floor Prep

CCIphase2_floors_drywall2-69_0

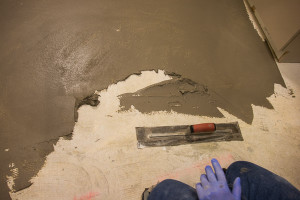
Surface prep. Repeat that 10 times. Now you have a list of the top ten things that will eat your lunch on a commercial or residential job if you don’t do them or estimate them properly. Residential and commercial contractors sooner or later face the challenges afforded by floor preparation of concrete or wall preparation of masonry surfaces. While we have heard and often experienced the best horror stories, we would like to share our experiences with floor/wall prep. Plus, technical service reps have a few of their own “dos and don’ts” that we want to share. Lack of prep, or poor prep, accounts for approximately 95% of all problems. An incorrect product choice makes up the balance of the problems. There is a joke in the flooring industry – we say that we’re still waiting to see the perfect floor. There is no such thing. The only solution to taking the mystery out of prep is to give you our knowledge and experience, which may help your bidding process. According to FCI (Floor Covering Installer) Magazine, several industry professionals were asked how they estimated the projected expense of floor covering preparation. They were surprised to find that there was no consensus on how this should be done. Estimating prep correctly begins with understanding concrete.
Concrete Properties & Slab Preparation
Concrete is a mixture of Portland cement, fine sand aggregate, coarse aggregate, water and various chemicals – but you knew that already. The water-cement ratio determines the quality of the concrete. The lower the percentage of water used, the higher the quality of the concrete, i.e., the compressive strength – but you knew that, too. What you may not know is that most slabs are finished with a steel trowel (smooth) finish to accommodate vinyl, carpet and wood. Ceramic tile and dimensional stone require a broom finish. “Satisfactory concrete” is obtained by determining the ratio of constituents and they must be consistent. The water/cement ratio should be controlled, as this is an important factor. The other factor to satisfactory concrete is hydration. Hydration is the chemical process resulting from the presence of water within the mix that creates strong slabs. Hydration continues as long as water is present inside the slab, even though you may think the slab is dry. This process may go on for 20 years. For “superior concrete”, hydration must be allowed to continue for a definite period of time. To make this happen, water loss must be controlled for approximately 28 days in order for the concrete to reach 90 percent of its strength. How is this done? Most of the time, a curing compound is used. Contrary to its name, curing compounds do not cure the concrete – they are designed to slow down the water loss so that the concrete will continue to hydrate. The concrete cures itself.
Surface Contaminants
Now here is where it gets interesting. All floor covering groups make recommendations for the ultimate installation of their specific product. While these recommendations are part of their trade, it sometimes doesn’t translate in a real, working project. Bead-blasting or sanding entire slabs is not cost-effective, so many general contractors leave this issue to the floor covering subcontractor. If this is new or existing construction, the floor covering sub is also faced with several other issues, i.e., paint over-spray and spills, chemical and grease spills, water damage to the concrete form excessive rain, dead cement, existing adhesives, miscellaneous coatings, construction dust and dirt, and drywall mud (which is a gypsum-based product). As a general contract, it is necessary to realize that surface containments can reach with the bonding of mortars or adhesive. Trust me on this.
Flatness or Levelness? – That is the Question
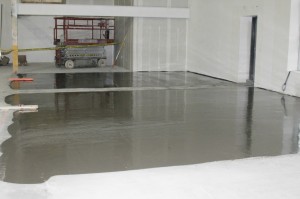
Once the floors get clean (for a small fee!) we can cure some of the other problems, such as flatness. Industry tolerances remain at ¼-inch variation per 10 feet. (There are some products which do not work well with this tolerance, i.e., large unit ceramic tile.) In a perfect world of unlimited funds from the Owner and price never being objectionable for the G.C., self-leveling compounds will fix the problem. Once again, there is no such thing as a perfect floor or unlimited funds, so the only requirement for the floor covering mechanic is that the floor be FLAT and not LEVEL.
Profit and Loss Time
So what does all this mean for the estimator? Knowing how to bid floor preparation is a skill in itself. There is no cut and dried way, there is no how-to manual and if you talk to specialist in the field, they don’t all agree on the sure-fire way to estimate floor prep. What they will tell you is that if you understand concrete, if you educate yourself by attending seminars, speak with knowledgeable individuals and read related materials, you might have a leg up on your competitor. As a floor covering subcontractor, we can only hope that other subs are doing their jobs and trust that some common courtesy can go a long way towards satisfying everybody. Although that is a Pollyanna way of looking at things, this should give you a little food for thought when it comes time to estimating that next project.
TTM-2012-12-0044-1024x682


Recent Posts

  • Wall Washed Lighting & Lighting Placement for Ceramic Tile Walls
  • Scratching the Surface: The Mysteries of Floor Preparation – Gisa Ott

Categories

  • Floor Prep
  • News

Archives

  • February 2014
  • December 2013

Mission Statement

Our Mission is to build individual and organizational success by developing a united team that will reflect unparalleled leadership in our industry.

Recent News

  • Wall Washed Lighting & Lighting Placement for Ceramic Tile Walls
  • Scratching the Surface: The Mysteries of Floor Preparation – Gisa Ott

Contact Us

3639 N. Raceway Rd., #100
Indianapolis, IN 46234


Phone: 317-299-0541


Fax: 317-299-0542


Click here for more Contact options

Area Rugs


Visit our online shop to browse all products and buy now >

Footer CCI Logo    About Us | Services | Portfolio | Contact Us    © 2014 Carpet Corner of Indianapolis